Posts

WEEK 18: (FYP2) SUBMISSION OF THE FINAL REPORT AND THE PROGRESS REPORT

So this is the last week before the submission date for the hardcover thesis. This week, I have to print the hard cover thesis to make sure the submission is on the due date. The submission deadline for all FYP 2 report is on 16/06/2021. ACKNOWLEDGEMENT     Alhamdullilah, all praises to Allah for the strengths and His blessing in completing this report and make this work easier through all the challenges. Special appreciation goes to my respective supervisor, Dr Hasmiza Bt Harun for all his advice. I would like to express my special thanks of gratitude to my friends who have given their endless support and encouragements. Here to the bright future Insha’Allah. Last but not least, more importantly, we like to give a thousand thanks to our parents and also to my siblings for their endless love, prayers and encouragement. Also, not forgetting, those who indirectly contributed to completing this final report, your kindness means a lot to me. Than...

WEEK 17: (FYP2) PRESENTATION DAY

Image
This week is a presentation day for FYP 2. The presentation for FYP 2 had been held according to the details as below: Date: 2/6/2021 Day: Wednesday Time: 8:00AM - 12:00PM Venue: M. Teams Students are divided into several group in the teams to be access. They need to be at early in teams in order to hear simple briefing and attendance checking by the Accessor. The process of assessing begin at 10:00 am where students are being assessed as the listed on the assessor's list provided by the committee. The list of assessor has been listed and posted by the FYP committee. So, my assessor for my FYP 2 are Sir Zuber and Madam Sabrina. The presentation can be considered went well. So the next step is to finish the progress report and the thesis. The last day for the submission date is on 16/6/2021. So the thesis must be complete before the due date.

WEEK 16 : FINALIZE REPORT, SLIDE AND VIDEO PRESENTATION

Image
So, this week I have to make a final check of my report before submitted and print the hard cover. The final report need to check the plagiarism in order to make sure that the report is write originally and not copy from other writing. The plagiarism percentages should below than 20%. Below are my plagiarism checking: This thesis has to be submitted to the library, the hardcover with a dark blue colour code. LIST-TO-DO for thesis submission; 1. Do correction on the thesis based on your SV comments. 2. Get plagiarism report from your SV. Make sure you meet the allowable percentage of plagiarism (no greater than 20%) 3. Make sure your thesis follow the correct format. FYP coordinator will ask you to reprint your thesis again if it is not in the proper format. 4. Download all related forms for thesis submission from the FYP website (click Student --> Submission) 5. Get your SV signature on three (3) important documents (i.e. approval page in the thesis, project submission form and fron...

WEEK 15 : FINAL TOUCH UP AND PROJECT PROGRESS

Image
In this week, I'm doing the final touch on my project. By using the enclosure that I bought I put the circuit I solder in the enclosure. The enclosure is in compact size so it will be easy to carry around by the user. All the wire is arrange carefully pack in the enclosure. We are required to attend the meeting with the supervisor to update the progress on the project. After presenting madam Hasmiza ask me to collect several data from the subject and make a line chart to analyse the data obtain. The average of respiration rate was recorded to compare the rate between sitting and standing position.

WEEK 14 : THESIS WRITING

Image
For this week, I'm taking a break from the busy day to clear my mind. It a bit stressful to continue the preparation. So I decide to chill out for a week and focus on subject, lab report and other assignment. The progress for this week is to complete the draft of the thesis paper as the results of the research is done. The result of the finding is put into a GRAPH as the results of the RESPIRATION RATE is taken from the several subject from the testing. After including all of the results from the finding of the testing, the analysis of the results is written. The thesis paper is then completed with the final chapter is also written with the correct format is used for it. After the thesis paper is finalized with my supervisor, the technical paper is proceeded to be written.

WEEK 13 :(FYP2) DATA COLLECTION FOR ANALISIS

Image
 In this week, I started to collect the data for the result. I'm asking my several of my friends to be the subject to wear the Respiration Rate Monitoring System. Sitting Position Standing Position The data was collected in two position which is sitting and standing position. The data is recorded in graph form.

WEEK 12 :(FYP2) TECHNICAL REPORT FYP BRIEFING

Image
There was a briefing on a technical paper this week. The goal of this technical document is to provide a 5-page summary of the FYP report. It will be graded by industry professionals rather than the FYP supervisor. It can also boost a student's worth during a job interview in the future by demonstrating to the industry that UniKL BMI students can generate a high-quality technical paper that can be displayed in public. It simply needs to be 5 pages long, and it doesn't need to be long and complicated. We can ask from the supervisors for advice on how to write a good technical paper if they need it for this technical paper. It will be graded along with the FYP report, but it will be graded separately.

WEEK 11 : (FYP2) SETUP HARDWARE AND SOLDERING

Image
  The soldering process need to be done to connect all the components on the stripboard. Soldering is a metal-to-metal connecting process that involves melting solder and using it to attach several metals together. Solder is a tin-and-lead metal alloy that is melted with a hot iron. The iron is heated to above 600 degrees Fahrenheit and then cooled to form a strong electrical connection.

WEEK 10: (FYP2) MEETING WITH SUPERVISOR

Image
In this week, the meeting is was conducted with the supervisor online via M. Teams. The content of the meeting is about the progress of the project.  Dr. Hasmiza recommend that using the stripboard for the circuit.  Stripboard  is one of the commonly-used types of prototyping board. These boards are intended for permanently assembling one-off circuits, especially prototypes. The board is made from insulating material, usually a resin-bonded plastic or fibreglass.  It make the circuit more steady with the help of soldering.

WEEK 9: (FYP2) UPLOAD AND TESTING THE CODING ON THE CIRCUIT

Image
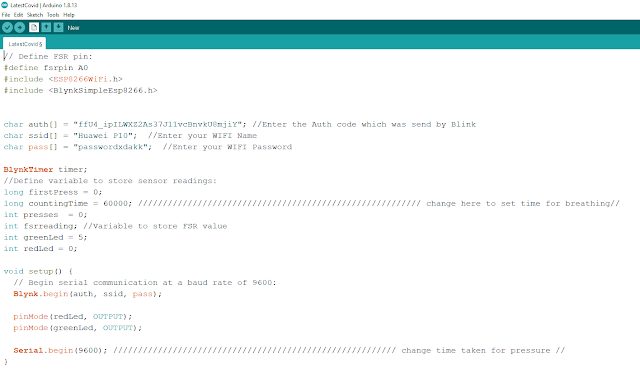
This is week 9. For this week I will try upload the source code in the NodeMCU the test the circuit functionility.   In this system, the NodeMCU is connected to the internet and through the Blynk server to display the data retrieve from the FSR sensor. This is an excellent example of an IoT application in which the PUI can be monitored remotely using internet connections. Below is the coding upload in the NodeMCU. When the circuit connected to the Blynk via Wi-Fi the Green LED will light up. When the Force Sencitivity Resistor is press and release the Red LED and Green LED will light up respectively.

WEEK 8 : (FYP2)THESIS WORKSHOP & SETUP BLYNK APPLICATION CONNECTION

Image
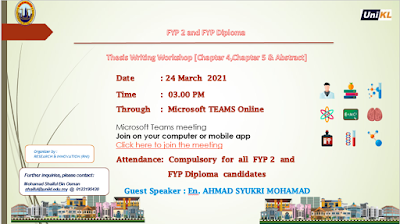
In this week, the briefing was conducted online via M. Teams as usuall, all the attandance of all FYP 2 student is compulsory. The briefing was by Sir Osman and En Ahmad Syukri. This week briefing is about the  Discussion  (Chapter 4) and Conclusion (Chapter 5).                     Date: 24/3/2021                     Venue: Online via M.Teams                     Time: 3:00PM - 5:00PM In this briefing, the FYP committees have been brief us about: How to write the Discussion and Conclusion If possible do a graph, chart or table for the measurement result           *if graph, it must has a title, the x and y axis must be correct The discussion and conclusion must be in past tense The picture of the result must has a caption For conclusion, just summarize what has been done Its okay if the project not functio...

WEEK 7 : (FYP2)TEST THE SENSOR OF CIRCUIT ON THE BREADBOARD

Image
After doing the schematic diagram of the circuit last week, so its time to test the circuit connection on the breadboard. So here is the circuit I construct to test the functionality and the connection of the circuit. The picture above show that the circuit work after it was power up by 3.7 Volt Lithium ion battery. The test pen and multimeter is use to check the connection between the components.  

WEEK 6 : (FYP2) DESIGN SCHEMATIC DIAGRAM OF THE CIRCUIT

Image
 For this week, I'm going to design the circuit diagram for my project. This circuit consist of several component including the microcontroller NodeMCU.   So, I'm using the fritzing software to design the circuit diagram on breadboard. I'm using A0 as the Input for the Force Sensitivity Resistor. For LED I'm using the D1 and D3 pin for the output. The push button is use as the external reset button and is connected to the RESET pin. The switch is use to turn on and off the circuit. So how this device work. when we are breathing, there will be a change in resistance with respect to the force of the thoracic. When breathing occurs, there will be increase in the force. This increase in force will reduce the resistance in FSR and this reduction in resistance will allow conductance and this conduction is counted as one breath. This is the process involved in measuring the heart rate.

WEEK 5 : (FYP2) PROJECT DESIGN

Image
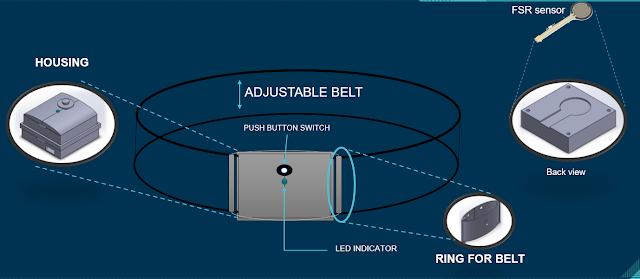
 For this week, I'm using the paint sofware and the microsoft word to design the project. 

WEEK 4 : (FYP2) SOFTWARE IMPLEMENTATION

Image
For this week, I will go through the software for the project which is Arduino IDE and the Blynk application on the phone to get more understanding of the software. Arduino IDE The Integrated Development Environment (IDE) for Arduino is a cross-platform Windows framework developed in Java. It is available for a variety of operating systems, including MAC, Windows, and Linux, and it's built on the Java Platform with built-in functions and commands that help with code debugging, editing, and compilation. There are a variety of Arduino modules available, including the NodeMCU, Arduino Uno, Arduino Mega, Arduino Leonardo, and Arduino Micro, and the microcontroller used is the NodeMCU for this project. Each of them includes a programmed microcontroller on the board and accepts the information in code form. Ultimately, a hex file that is then transferred to the controller on the panel and uploaded will be generated by the main code, also can be called a sketch, generated on that IDE pl...

Week 3: (FYP 2) COMPONENTS RESEARCH AND FINDING

Image
Activity: Hardware Follow Up  During the third week, I'm  using my time to revise back the component I  use in the propose project to be bought for the FYP2. After trying to use the existing item to make the system. I discovered  that the Arduino Uno R3 is at the disadvantage  because of the less pin provided on the board to be connected to the ESP8266 Wi-Fi module and the Bluetooth    module. Therefore I  have decide  to change  the microcontroller  board to the NodeMCU. This is because  the NodeMCU  already have an imbedded  Wi-Fi module on the board  with a lot of GPIO pin.\ Below is the component that have been research and need to be used for this project. a)     Monitoring System 1-     NodeMCU ESP8266 (1 unit) 2-     Force Sensitivity Resistor (1 unit) 3-     TP4056 Battery Charger (1 unit) 4-     Momentary SPST Push Button ...